What is SmartyPi?
August 2022 - SmartyPi SE, PCB Revision 1.1 and above
SmartyPi – What is it?
SmartyPi SE is a PCB designed to be used with a Raspberry Pi 4B (1, 2, 4, or 8 Gb RAM) to emulate a limited number of arcade games. The SE PCB ships ready to connect an Out Run arcade cabinet (Upright or Midi) and Turbo Out Run cabinets. Adapters which connect to SmartyPi’s expansion port will enable use in different cabinet types (Hang-On, After Burner II). Connectors from original arcade cabinets are plugged into SmartyPi, and with minimal configuration you can play any games you are entitled to play.
The original concept was to produce a PCB based system which could replace faulty Sega arcade games from the mid to late 1980’s. These PCB’s do fail, and for most, they are not the easy to repair, custom integrated circuits are not available as off the shelf parts, so spares can usually only be obtained by taking from another game PCB, SmartyPi aims to provide reliability and ease of use allowing you to play your arcade game without fear of hardware failure, along with some nice additional functionality.
When power is applied, SmartyPi will boot and run the expected game without user interaction, the full controls of the arcade cabinet will work as the user would normally expect.
SmartyPi is intended to be used in the home environment, I would like to think it will be a reliable replacement for unrepairable or missing original game PCBs.
What cabinets are supported?
SmartyPi SE PCBs from Revision 0.9 and newer are built with connectors in place for Out Run cabinet connections, with support for Upright of Midi cabinets including Turbo Out Run. Deluxe Cabinets with motion are not currently supported, there is provision in the design to support moving cabinets but at this point it is not implied that the current PCB design will be upgradable to support any Deluxe games.
SmartyPi is designed in a way that new game adapters can be plugged into the SE PCB (SEGA Edition), and in turn a different game cabinet. While not all currently available, these will include Hang-On & Super Hang-On using the same adapter, After Burner II, Space Harrier, Enduro Racer and Power Drift all with bespoke adapters. These will become available in the future and will be fully compatible with all versions of the SE PCB from 0.8 and newer.
Can I add additional games to SmartyPi? I want all the racers ever made working in my Out Run cabinet.
No is the simple answer, SmartyPi has been designed for simplicity and minimal user configuration to make it work. Any supported games all work with similar controls to the cabinet being used, or may have limitations that do not impact gameplay, this fits in with the design ethos of the product. If you require lots of games to work in the same cabinet, SmartyPi is not for you.
Technical – High Level design
The SmartyPi SE PCB provides a connection to a Raspberry Pi, this is the heart of the system and runs an optimised operating system along with an emulator to run the games. The Raspberry Pi also interfaces conversion of the video signal to be compatible with arcade monitors. The control interface is provided using an Arduino compatible Microcontroller with USB connection to Raspberry Pi, this will be automatically configured based on the game cabinet it is plugged into. A Micro SD card interface is provided (separate from the Raspberry Pi Micro SD card), and a simple text configuration file can be altered on a computer, this then allows for the selection of the cabinet and game list being used, and whether multi-game functionality is required. There is built in support for output control, specifically the flashing start button, additional lamps and wheel/shaker motor circuits.
SD Cards and filesystem
The SD card connected to the Raspberry Pi has a green sticker attached.
- This SD card contains the Linux operating system, with a build of Raspberry Pi OS. For those interested, there are multiple partitions on the SD card, more information on these can be found in the Advanced configuration guide.
- A custom build of MAME 0.228 is installed and configured for the complete selection of games SmartyPi supports.
- A build of Chris White’s Cannon Ball is provided, with full compatibility for SmartyPi.
- The Pro-Micro (microcontroller) has a USB connection to the Raspberry Pi. This provides a connection to your arcade cabinet controls via Opto-isolated circuitry (digital inputs) to protect the microcontroller. The analog controls (Steering & Brake etc.) are also controlled by the microcontroller – All controls are seen as a USB joystick to the Raspberry Pi.
- The Pro-Micro’s USB connection also provides a bi-directional RS232 communication channel between itself and the Raspberry Pi, this is how the communication for game list, game switching and control of the game outputs signals take place.
- A custom Python script running on the Raspberry Pi takes care of the RS232 communication received from the Pro-Micro and in turn controls the software applications (MAME, CannonBall) and starts and stops them as necessary.
The user should have little need to remove the SD card from the Raspberry Pi other than to update it if future images are released with new features.
The Micro SD card which is connected to the reader built into the SmartyPi circuit has a blue sticker attached. The SD card is formatted in the FAT format. There are a couple of files and folders on this SD card.
- The primary and most important file is called ‘setup.txt’ this contains the configuration options for SmartyPi which decide which cabinet it is connected to, and the game list to load. If it is incorrectly formatted or adjusted out of parameter spec. you will likely only see the boot SmartyPi logo, and it will never load a game. See the SmartyPi setup document for full instructions.
- No game ROMs are supplied with SmartyPi, but a compatible set of ROMs are available to download from the public internet. Within the ‘ROM Pack’ folder there is an application which will allow you to download the required ROMs for a SmartyPi installation, the files are download from the internet, once downloaded these files must be copied to a USB stick and inserted in a spare Raspberry Pi USB port. The files will then be copied to the correct destination ready for use. See the SmartyPi setup document for full details on this functionality.
Audio level adjustment
- There are two adjustable resistors on the left side of the PCB, these control line out volume of the audio that goes to the header connector which feeds you cabinets audio amplifier. Depending on the volume level set by you cab controls I would recommend a setting of ½ to ¾ for optimal output.
Video Output
- The 15KHz RGB video signal is generated using the ‘GertVGA’ 565 spec. This uses a 5-bit DAC for red and blue colour signals and a 6-bit DAC for the green signal. The horizontal and vertical sync signals are combined in a small circuit on the SmartyPi PCB that allows it to be connected directly to the arcade monitor. In most cases none or very minor adjustments may be required to the monitor position or size. Any adjustments would to be made using the monitor controls, doing so is beyond the scope of this document, but the controls you may need could be vertical or horizontal size and position, along with vertical sync if you have an unstable ‘rolling’ image. Check in your monitors manual for the control locations and follow any instructions provided.
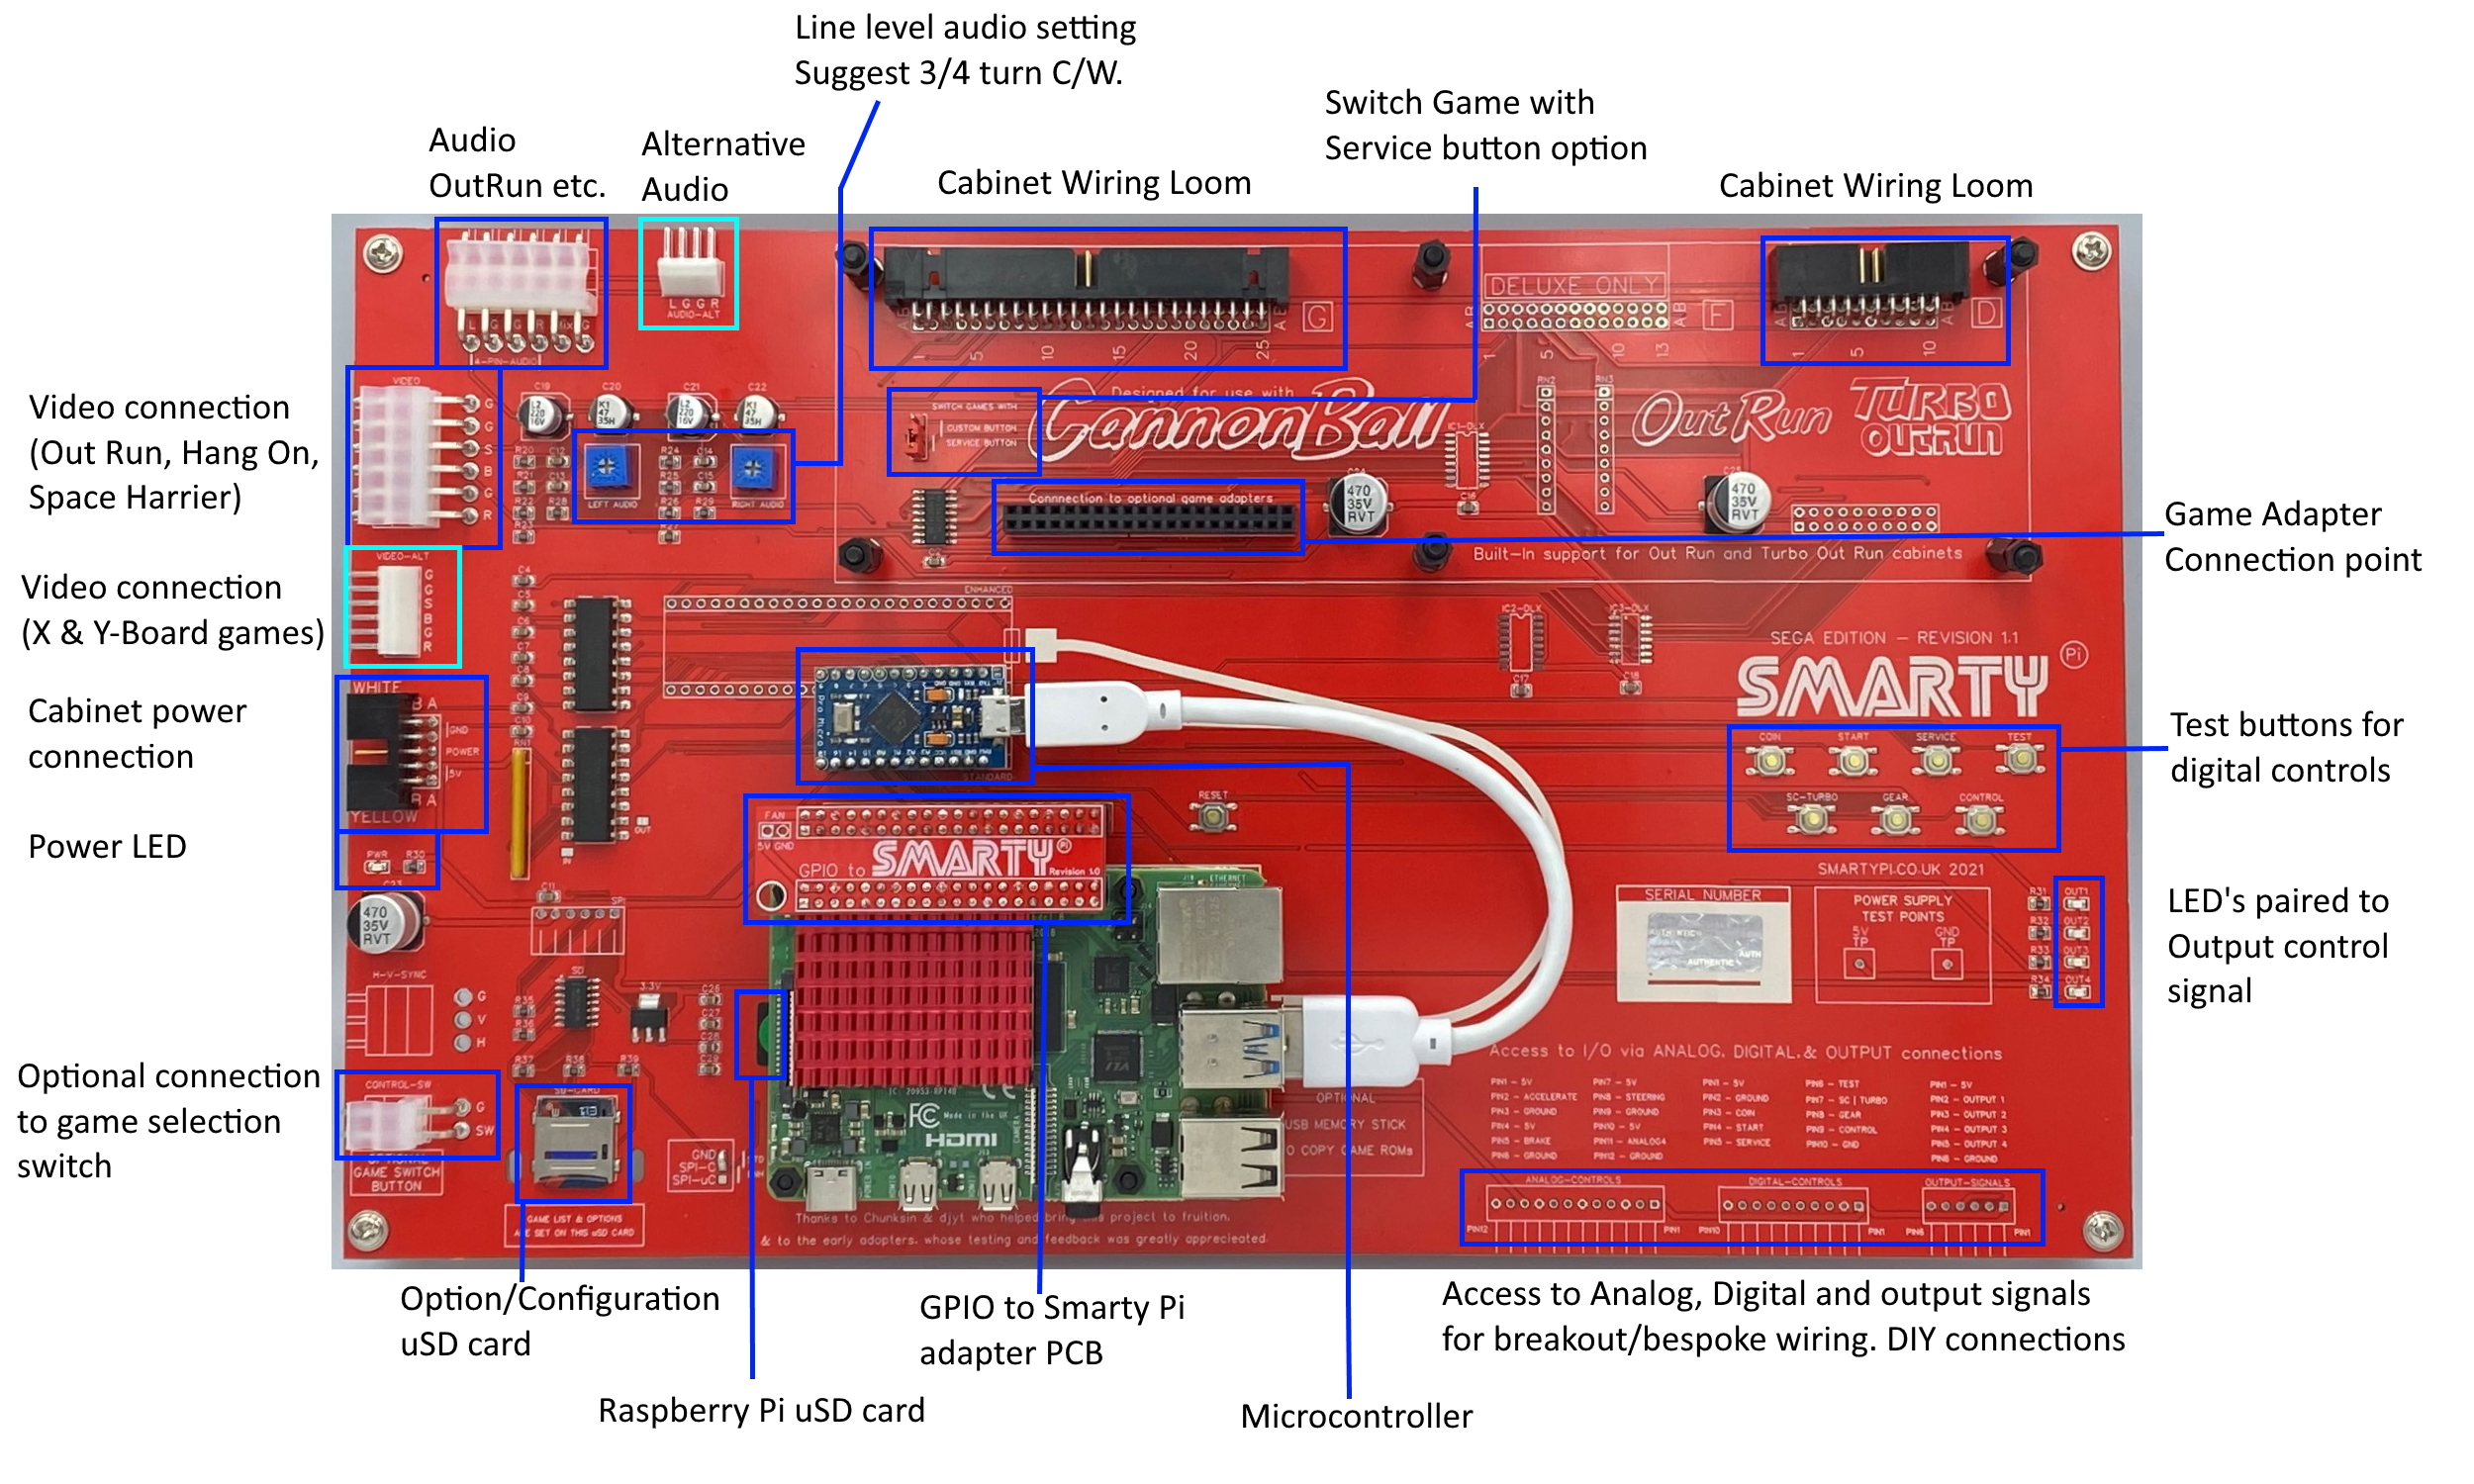
SmartyPi component locations
Further information can be found at smartypi.co.uk or you can contact me via email at smartypi.arcade@gmail.com Other SmartyPi users may be able to help with any technical issues, they can be found on the UKvAc forum, or on Facebook in the Out Run Arcade Owners and Enthusiasts, or SmartyPi User’s groups.
Display prices in:GBP